- Please check the following contents.
I. About the “Counter weight”
1. What is the “Counter weight”?
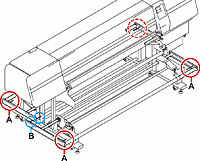
This is the “Weight” that it will be attached on both edges of the Tension bar. The each weight of a counter weight is 200g, and 40 Counter weights are available for a printer. You will use these counter weights to control the media tension.

2. When do I need to adjust these Counter weights?
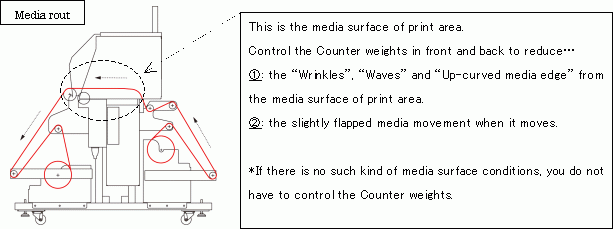
You need to adjust these Counter weights when the media surface of print area is not flat or slightly flapped while it moves where the print head carriage moves over to right and left.

3. The theory of Counter weight
Some “wrinkled”, “waved”, “up-curved” media surface of print area are slacked if you compare to the other “flat” area. The weight of the “Counter weight” stretches the “flat” area, and makes it same level of length as the “non-flat” area to improve the “non-flat” conditions.
4. Why the print area media surface has to be flat?
Why the media can not be slightly flapped while it moves?
If the print area is non-flat or slightly flapped while it moves, the print head carriage will be jammed with pop upped media. Once print head carriage jammed with media, it will be not only color shifted on media surface but also it may damage the print head and you will have print head nozzle clogged issue.
【Caution】
If you try to avoid the media jam by changing head gap higher than the recommended head gap to print (which is 3.0mm), you will have “ink mist issue” instead, and it will be a cause of second issues such as “Dirty print result”, “Nozzle out issue”, or “Nozzle deflection issue”.
The head gap can be 3.0mm after you adjust the head height with the “Head height adjustment rod”.
【Reference】
Basically you need to adjust the head gap (the distance between print head surface to media surface) to make 3.0mm head gap based on the media surface after you set new media on printer.
Refer to “Operation manual ”-[Chapter2]-[Setting a media]-[Adjusting the Head height]
II.How to set up the Counter weight
1. Before you set up the Counter weight
Please make sure the media itself is under the condition of the list or not which the list you can refer from following condition list.
【Reference】
“Operation manual ”-[Chapter1]-[Media]-[Fabric conditions which enable to print]
Even the media itself is out of condition, you may be able to use the media if you can make the non-flat surface to flat surface with using counter weights.
If the media surface is still non-flat or slightly flapped while it moves even after you tried to adjust with counter weight, we can not recommend that you set up the media. Please improve the media condition.
【Reference】
You may be able to refer the [III. Improve media condition ] to improve your media condition.
2. How to set up the Counter weight
Slide the Counter weights, and insert a clip to avoid the weights sliding out from the bar.
Please set up same number of weights on each tension bar edges.
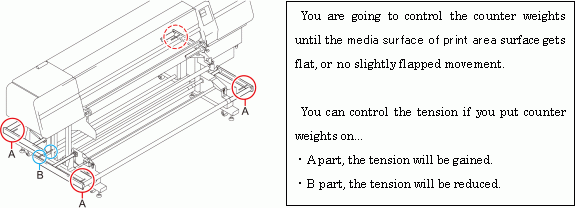
EX1) Set up “4peaces” of counter weights on each tension bar edges (A part).
EX2) Set up “2peaces” of counter weights on both back and front side of inside tension bar (B part).

Even there are no counter weights, the tension bar itself is 3000g, and thus the media has already 3000g tension. If you want more tension, you will put weights on A part, if you want to reduce tension, you will put weights on B part.

3. The Counter weight adjustment
① You adjust counter weights with checking the media surface condition of print area.
1). If the tension is weak, the media surface will have “Slacked”, “Waved” or “Up-curved media edge”.
⇒You will keep adding counter weights until the print surface gets flat.
⇒If you can not reduce the “Up-curved media edge” lower than 2.0mm even after you kept adding these weights, please set up “Cloth holder (Media edge holder)” on the media edge.
2). If the tension is heavy, you will start to see some “Wrinkles” between the pinch rollers.
⇒You will start reducing the weights until you do not see the “Wrinkles” anymore.
⇒The counter weight setting which you could stop seeing the “Wrinkles” is the best counter weights adjustment for the material.
② After you finish the counter weight adjustment, you will forward the media about 300mm to make sure the media surface of print area is still flat and no flapping while it moves.
4. The most appropriate counter weight adjustment for each media
There is no problem if the print area condition can be flat and no flapping movements after the counter weight adjustment, but sometimes it is difficult to have such as an ideal result.
In the past, the media which could not have ideal condition even after the normal counter weight adjustment could become better condition with following counter adjustment methods.
Please try following Example1, and Example2.
[Example1]
In case of pre-treated “Cotton Satin” which has waved media edge, it was possible to make it ideal flat condition with setting up the counter weights on front side heavier than back side.
Back side tension bar weights:0 weights
Front side tension bar weights:5 weights on each right and left side
Cloth holder (Media edge Holder): It must have it for the “Up-curved media edge”.
