Duotone image file is the key to utilize clear and primer inks.
Mimaki Flatbed UV inkjet printer can apply primer and clear inks onto desired areas.
The duotone image file is used to realize this capability.
What is the duotone image file?
This tutorial provides you the answer.
Prepare Photoshop and Illustrator
Adobe Photoshop is the photo editting software. Adobe Illustrator is the graphic design software.
Both of them are very popular among professionals but are difficult to master.
To make the file creation simple, in this tutorial, only essential procedures are selected.
If you have never used Photoshop, we recommend affordable Photoshop Elements which is designed for beginners.
Note: In this tutorial, we use Illustrator /Photoshop CS4.

Prepare for image editing
Let's get started!
Chose File > Open
Select the name of the file you want to open.
After opening the file, you can see only one layer is listed on Layers panel.
If the image file is opened in Photoshop for the first time, rename it as shown below.
Click the layer and rename to make it editable.
Adjustment of Brightness and Contrast
Chose Image > Adjustment > Brightness/Contrast.
Make clear contrast between dark and bright areas by moving each slider.
On the right image, each parameter is set as follows. The parameter varies depending on the image.
Brightness/-50
Contrast/100
Convert the image to duotone!
Choose Image > Adjustment > Threshold.
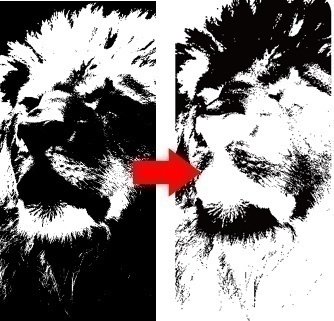
The image should be displayed in black and white.
The image should not be too white or black. Find the appropriate level by moving a slider.
Click "OK" and save the best threshold.
Choose Image > Adjustment > Invert
Black and White areas are inverted. Clear or primer ink will be printed on the black area.

Place the duotone image in Illustrator
Illustrator is used for finishing the file creation.
Choose File > New
Create a new file.
Click Rectangular from Tool box.
Measure a product that will be printed and draw an outline of it.
In this tutorial, a smartphone case is measured and drawn.
Choose File > Place
Select the duotone image created by Photoshop.
Create a clipping mask
Stack the rectangular image over the duotone image.
Make sure that the rectangular image, shape of a product that will be printed, is at the top of layers.
Select two image layers and right click then select Make Clipping Mask.
The image is clipped same shape as the smartphone case.
Finishing
Place other objects such as company logo. Mimaki company logo is placed.
Change the color to K (100%) for clear or primer ink printing.
File > Save as
Save the file an EPS format.
Create a color image file
Create a color image file after the duotone image.
Right-click on the clipping masked duotone image and select "Release Clipping Mask".
Clipping mask is released and the image regains the original size.
Window > Links > Relink
Select two images and click on "Relink" icon.
File >Place
Select an original color image file.
The duotone image and the color image files are replaced at the same position.
Duotone and color images must be placed at the same position to obtain perfect print results.
Finishing
Create a clipping mask on the color image.
Logo should be placed at the same position as the duotone file.
File > Save as
Save the file an EPS format.
See "How to Process Image File by RasterLink"
Basic tutorial of RasterLink, Mimaki software RIP
All image files are created.
The next tutorial describes how to transfer the image files to Mimaki inkjet printer by using RasterLink.
How to Process Image File by RasterLink


Application


